
 guozhanxin
9e79333512
[project] update mdk/iar project and config.
guozhanxin
9e79333512
[project] update mdk/iar project and config.
|
1 year ago | |
|---|---|---|
| .. | ||
| applications | 2 years ago | |
| board | 2 years ago | |
| figures | 2 years ago | |
| xip | 2 years ago | |
| .config | 1 year ago | |
| .ignore_format.yml | 3 years ago | |
| Kconfig | 3 years ago | |
| README.md | 2 years ago | |
| README_zh.md | 2 years ago | |
| SConscript | 3 years ago | |
| SConstruct | 2 years ago | |
| evkmimxrt1060_sdram_init.mac | 2 years ago | |
| project.ewd | 2 years ago | |
| project.ewp | 1 year ago | |
| project.eww | 2 years ago | |
| project.uvoptx | 3 years ago | |
| project.uvprojx | 1 year ago | |
| rtconfig.h | 1 year ago | |
| rtconfig.py | 3 years ago | |
| template.ewd | 2 years ago | |
| template.ewp | 2 years ago | |
| template.ewt | 2 years ago | |
| template.eww | 2 years ago | |
| template.uvoptx | 3 years ago | |
| template.uvprojx | 3 years ago | |
README.md
NXP MIMXRT1060-EVK BSP Introduction
英文 | 中文
This document records the instruction of the BSP (board support package) that provided by the RT-Thread development team for the MIMXRT1060-EVK development board.
The document is covered in three parts:
- Resources Introduction
- Quickly Get Started
- Advanced Features
By reading the Quickly Get Started section developers can quickly get their hands on this BSP and run RT-Thread on the board. More advanced features will be introduced in the Advanced Features section to help developers take advantage of RT-Thread to drive more on-board resources.
1 Resources Introduction

Features:
- MCU: MIMXRT1062DVL6A, 600MHz, 4096KB FLASH, 1024KB RAM
- External RAM: IS42S16160J-6BLI, 32MB
- External FLASH: S26KS512SDPBHI02, 64MB
- Common-used Peripherals:
- LED: One, D18(Green)
- Button: One
- Common-used Interfaces: USB 、SD Card、Ethernet、LCD, etc
- Debugging interface, standard JTAG/SWD
1.1 For more details about these boards, please refer to NXP Official Website
1.2 Peripherals Condition
Each peripheral supporting condition for this BSP is as follows:
| On-board Peripherals | Support | Remark |
|---|---|---|
| USB | √ | |
| SPI Flash | √ | |
| Ethernet | √ | |
| On-chip Peripherals | Support | Remark |
| GPIO | √ | PA0, PA1... PK15 ---> PIN: 0, 1...176 |
| UART | √ | UART1 |
| SPI | Coming Soon | |
| I2C | Coming Soon | |
| SDIO | Coming Soon | |
| RTC | Coming Soon | |
| PWM | Coming Soon | |
| USB Device | Coming Soon | |
| USB Host | Coming Soon | |
| IWG | Coming Soon | |
| Expansion Module | Support | Remark |
| LVGL | √ |
1.3 Quickly Get Started
This BSP provides MDK4, MDK5, and IAR projects for developers and it supports the GCC development environment. Here's an example of the MDK5 development environment, to introduce how to run the system.
1.4 Hardware Connection
Use a cable to connect the development board to the PC and turn on the power switch.
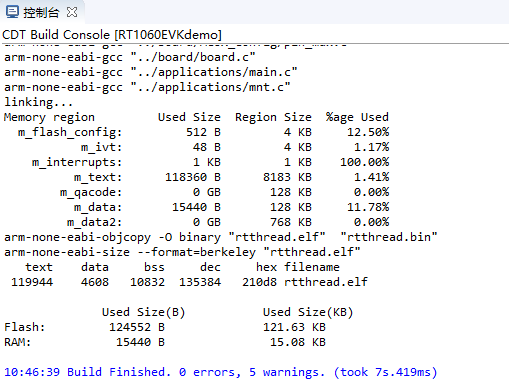
1.5 Compile and Download
Double-click the project.uvprojx file to open the MDK5 project, compile and download the program to the development board.
The project defaults to use the CMSIS-DAP emulator to download the program, and as we're connecting the development board via USB, click the Download button can directly download the program to the development board
1.6 Running Results
After the program is successfully downloaded, the system runs automatically. Observe the running results of the LED on the development board, the LED will light in 1Hz.
Connect the corresponding serial port of the development board to the PC, and when the corresponding serial port ( 115200-8-1-N) is opened in the terminal tool, the output information of RT-Thread can be seen when the device is reset:
 \ | /
- RT -     Thread Operating System
 / | \     4.1.0 build Mar 10 2022 18:07:41
 2006 - 2022 Copyright by RT-Thread team
msh >
1.7 Advanced Features
This BSP only enables GPIO and UART1 by default. If you need more advanced features such as SD Card, Flash, or you need to configure the BSP with RT-Thread homegrown ENV tool, as follows:
- Open the ENV tool under the specific BSP folder;
- Enter
menuconfigcommand to configure the project, then save and exit; - Enter
pkgs --updatecommand to update the package; - Enter
scons --target=mdk4/mdk5/iarcommand to regenerate the project.
More details about NXP MIMXRT1060-EVK , check out Here.
2 MIMXRT1060-EVK User Manual
This manual records the execution instruction of the MIMXRT1060-EVK on RT-Thread homebuilt IDE RT-Thread Studio.
2.1 Preparation
- Clone the RT-Thread repository from GitHub to your local. Link
- Download and install RT-Thread Studio. Link
- Prepare the RW007 module.
2.2 Quickly Get Started
2.2.1 menuconfig to configure the project
Open the directory where the MIMXRT1060-EVK BSP is located and use the menuconfig command in the ENV tool to configure the project

2.2.2 Cancel the configuration that is not needed, as follows:
Set the Onboard Peripheral Drivers option:

Set the On-chip Peripheral Drivers option:

2.3 Go to File, and click the Import

2.4 Import RT-Thread BSP to workspace

2.5 Fill out the project info

2.6 Compile project
Till now, the project is compiled, and the preparation is completed.
3 Use RT-Studio to Configure BSP Driver
Each BSP of RT-Thread already has several drivers by default, such as on-chip peripheral driver and on-board peripheral driver, and the drivers can be enabled by opening the corresponding configuration and setting the parameters according to the use environment on RT-Studio IDE. Since the pin has the multiplexing function, it may not have both the available on-chip peripheral driver and on-board peripheral driver at the same time, so it is necessary to check the schematic while enabling the corresponding peripheral drivers.
RT-Thread has a lot of up-for-grab software packages, by using RT-Studio IDE, the software packages can be easily added to the project.

4 Connect to Internet: Use the RW007 module
The RW007 is a high-speed WIFI module that uses SPI to communicate with the host. Check the User Manual.
The SPI interface provided by the MIMXRT1060-EVK onboard Arduino interface has duplicate pins with the pins used by the SDIO interface of the SD card, so the on-board SPI interface is not connected by default. We'll be needing you to connect it, check out the location marked DNP in the schematic diagram below (this step is necessary when using the SPI interface). You can use the SPI interface led by the onboard Arduino interface, in this case, the on-board SD card slot is not available.

Solder works must be done before next step:

4.1 Configure the onboard SPI peripherals
RW007 supports SPI interface for communication, MIMXRT1060-EVK supports SPI driver, defaults to using polling mode to communicate with RW007 (currently it does not support interrupt and DMA mode to communicate with RW007), the following shows how to use RT-Studio to configure SPI:

4.2 Configure the RW007 package using RT-Studio
Click the RT-Thread Settings option on the left, there is a configuration menu will be shown on the right, enter RW007 in the search bar, and select rw007:SPI WIFI rw007 driver, the corresponding configuration parameters are as follows:

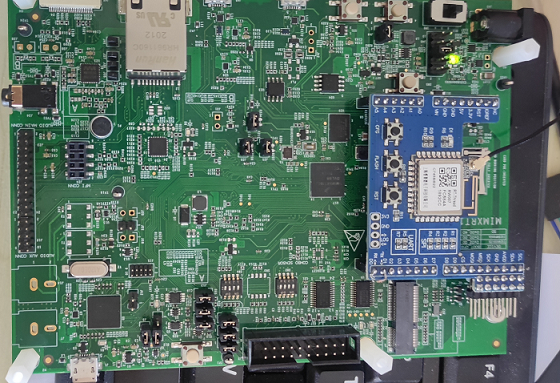
4.3 Plug the RW007 module into the onboard Arduino interface
4.4 Modify the RW007 example
RW007 has been ported into IMXRT1062 platform, the port file is at: board/ports/rw007_port.c, Once we select RW007 package, it will join into our project automatically, there is no need to modify any code for simply turn on this module.
4.5 After the modification is completed, compile the project and burn the firmware

rw007 sn and rw007 ver are successfully output, and RW007 driver is successfully connected.
4.6 WIFI connection test
Enter the wifi scan command into the shell to search for WIFI.

Enter wifi and press tab to list wifi-related commands:

Use the ping command to test if the WIFI connection is available:

At this point, the basic environment of the MIMXRT1060-EVK is successfully set up!